Nov 25, 2011

Fun Project: DotNetNuke module views

Last time I showed you how to create, build, package, upload and use a simple DNN module, developed in C# using Visual Studio
2010. Let’s get started by thinking (and writing down Smile) some requirements.

Requirements

Non-functional

R-NFR1 DotNetNuke 05.06
R-NFR2 ASP.NET 4
R-NFR3 local testability without DNN installation

Use Cases

As a client I want to:

R-U1 – Create an online account on the site
R-U2 – Log in and out
R-U3 – Choose a treatment
R-U4 – Choose a time/date
R-U5 – Book a massage 
R-U6 – Got sent an email confirmation
R-U6.1 with an outlook appointment attached to it
R-U7 – get shown my booked treatments in detail

As an administrator I want to:

R-A1 – Define treatments (duration, title, description)
R-A2 – Define time windows (opening or working hours)
R-A3 – Show (todays, etc.) bookings
R-A4 – Got sent an email with a client booking information
R-A5 – Manage accounts (list, add, edit, delete)

New Web Project

To separate DotNetNuke module stuff from booking web functionality I added a new ASP.NET web project to the solution

image

remove the generated pages, sub folders and strip down the web.config file to a minimum.

Now add a web user control to the BookingViews project

image

Telerik

Writing an outlook style schedule/calendar control in ASP.NET seems like a huge effort. Let’s get a commercial control library suite including a schedule control. As DNN already contains Telerik controls the evaluation was short. They have an excellent reputation when talking to colleagues.

Data Model

First let’s show the data access layer where the massage bookings and treatment offerings are persisted. Using the Entity Framework 4.0 model first approach, I create the following model:

image

The BookingEntry and Treatment entities were added in the model edmx in VS design view. However, the User entity was imported from the existing DotNetNuke database (table first). Adding some relations and I can take advantage of the DNN register/login/user functionality in my bookings.

View

Learning and configuring the module view took more effort. This is the resulting aspx:

<%@ Page Language="C#" AutoEventWireup="true" CodeBehind="BookingForm.aspx.cs" Inherits="BookingViews.BookingForm" %>


<%@ Register Assembly="Telerik.Web.UI" Namespace="Telerik.Web.UI" TagPrefix="telerik" %><!DOCTYPE html PUBLIC "-//W3C//DTD XHTML 1.0 Transitional//EN" "http://www.w3.org/TR/xhtml1/DTD/xhtml1-transitional.dtd"><html xmlns="http://www.w3.org/1999/xhtml"><head runat="server"><title></title></head><body><form id="form1" runat="server">

    <asp:ScriptManager ID="ScriptManager1" runat="server">

    </asp:ScriptManager>

    <div style="height: 527px; width: 827px">

        <telerik:RadScheduler ID="RadScheduler1" runat="server" Culture="de-CH" DayEndTime="19:00:00"

            DayStartTime="07:00:00" FirstDayOfWeek="Monday" Height="558px" SelectedView="WeekView"

            ShowViewTabs="False" Skin="Forest" Width="800px" WorkDayEndTime="19:00:00" WorkDayStartTime="07:00:00"

            SelectedDate="2011-11-01" DataEndField="End" DataKeyField="Id"

            DataStartField="Start" DataSubjectField="Subject"

            onappointmentcommand="RadScheduler1_AppointmentCommand"

            ontimeslotcreated="RadScheduler1_TimeSlotCreated"

            DataSourceID="BookingEntryDataSource" DataDescriptionField="Remarks"

            EnableDescriptionField="True">

            <ResourceTypes>

                <telerik:ResourceType DataSourceID="TreatmentDataSource"

                    ForeignKeyField="TreatmentId" KeyField="Id" Name="TreatmentResource"

                    TextField="Name" />

            </ResourceTypes>

            <WeekView DayEndTime="19:00:00" DayStartTime="07:00:00" HeaderDateFormat="dd.MM.yyyy"

                WorkDayEndTime="19:00:00" WorkDayStartTime="07:00:00" />

            <AppointmentTemplate>

                <span style        ="font-weight: bold; font-size: small">

                    <%# Eval("Subject") %>

                </span>

                <br />

                <asp:ImageButton ID="ImageButton1" runat="server" ImageUrl="~/Resources/Calendar.png" OnClick="ExportOutlook" CommandName="ExportOutlook" />

            </AppointmentTemplate>

        </telerik:RadScheduler>

    </div>

    <telerik:RadAjaxManager runat="server">

        <AjaxSettings>

            <telerik:AjaxSetting AjaxControlID="RadScheduler1">

                <UpdatedControls>

                    <telerik:AjaxUpdatedControl ControlID="RadScheduler1" />

                </UpdatedControls>

            </telerik:AjaxSetting>

        </AjaxSettings>

    </telerik:RadAjaxManager>

    <asp:ObjectDataSource ID="BookingEntryDataSource" runat="server"

        DataObjectTypeName="My.DotNetNuke.Modules.BookingModule.BookingEntry"

        DeleteMethod="Delete" InsertMethod="Add" SelectMethod="GetAll"

        TypeName="My.DotNetNuke.Modules.BookingModule.Data.BookingEntryDataRepository"

        UpdateMethod="Update"></asp:ObjectDataSource>

    <asp:ObjectDataSource ID="TreatmentDataSource" runat="server"

        DataObjectTypeName="My.DotNetNuke.Modules.BookingModule.Treatment"

        DeleteMethod="Delete" InsertMethod="Add" SelectMethod="GetAll"

        TypeName="My.DotNetNuke.Modules.BookingModule.Data.TreatmentDataRepository"

        UpdateMethod="Update"></asp:ObjectDataSource>

    </form>

</body>

</html>

The control’s data sources are of type ObjectDataSource. BookingEntryDataSource and TreatmentDataSource both implement the IRepository<T> interface. This hides the EF stuff behind a façade and allowed better testability than the EntityDataSource:

    /// <summary>

    /// Interface to decouple entities from data access.

    /// </summary>

    public interface IRepository<T> where T: class

    {

        void Add(T entity);

        void Delete(T entity);

        ICollection<T> GetAll();

        T GetById(T entryWithKeyOnly);

        void Update(T entity);

    }

Note that I added the telerik rad scheduler, configured a week view, added some appointment resources and DataSources to be bound in the scheduler control.

And this is the final result:

image

Double clicking shows or edits the details of the appointment

image

I hope this 3-part series of my (hobby project) development “minutes” gave you some insight around DotNetNuke module development in Visual Studio using C#.

Azure AppFabric Caching ASP.NET Session State Provider – not working with 2 Instances in the local Compute Emulator


A customer asked me for help about this.

Introduction

Windows Azure AppFabric Cache is a subset of the Windows Server 2008 R2 AppFabric distributed in-memory cache (aka “Velocity”) and typically provides it’s services for ASP.NET session provider and output caching.

Enable Cache

To speed up your web apps performance you first need to enable this Azure feature on the management portal

image

Click New Service Namespace –> select Cache –> select your Azure subscription (for the billing) –> the region of the data center –> and a name.

Configure Web App to use the cache

In the management portal Properties copy your host name and authentication token

image

image

to your web.config <Configuration> section:

<configSections>

  <section name="dataCacheClients" type="Microsoft.ApplicationServer.Caching.DataCacheClientsSection, Microsoft.ApplicationServer.Caching.Core" allowLocation="true" allowDefinition="Everywhere"/>

</configSections>


<dataCacheClients>

  <dataCacheClient name="default">

    <hosts>

      <host name="[SERVICE-HOST-NAME]" cachePort="22233" />

    </hosts>

    <securityProperties mode="Message">

      <messageSecurity

        authorizationInfo="[AUTHORIZATION INFO]">

      </messageSecurity>

    </securityProperties>

  </dataCacheClient>

</dataCacheClients>


<system.web>


  <sessionState mode="Custom" customProvider="AppFabricCacheSessionStoreProvider">

    <providers>

      <add name="AppFabricCacheSessionStoreProvider"

            type="Microsoft.Web.DistributedCache.DistributedCacheSessionStateStoreProvider, Microsoft.Web.DistributedCache"

            cacheName="default"

            useBlobMode="true"

            dataCacheClientName="default" />

    </providers>

  </sessionState>


Add assembly references to the Azure libraries

Microsoft.ApplicationServer.Caching.Client.dll
Microsoft.ApplicationServer.Caching.Core.dll
Microsoft.Web.DistributedCache.dll
Microsoft.WindowsFabric.Common
Microsoft.WindowsFabric.Data.Common

2 Instances

Configure your web role to use 2 instances. Otherwise you won’t notice the problem.

Attention

Make sure, you do not confuse with the Windows Server 2008 R2 AppFabric caching libraries. Use the ones under

C:\Program Files\Windows Azure AppFabric SDK\V1.5\Assemblies\NET4.0\Cache

Access the cache from code

In the following example from the AppFabric Lab Samples, store some shopping cart entries into the session

List<string> cart = this.Session["Cart"] as List<string> ?? new List<string>();

cart.Add(selectedItem);

Session["Cart"] = cart;

and read back

var itemsInSession = this.Session["Cart"] as List<string> ?? new List<string>();

Test it

Now when I start the app and add a product to the cart, stop the compute emulator, do an iisreset.exe and refresh the page – then I still see the product. This now comes from the Azure AppFabric Cache:

image

on instance 1. From the debugger:

Checkout on instance deployment16(44).AzureStoreService.MVCAzureStore_IN_1

Pressing F5 to refresh the page again in the browser I suddenly don’t see the product anymore

image

on instance 0. From debugger

Checkout on instance deployment16(44).AzureStoreService.MVCAzureStore_IN_0

Pressing IEs F5 again and again, shows or don’t shows the product …. ?!?

Problem

So the findings are, that the session cache basically works, but not in a (load-balanced) multi-instance environment on the local development fabric compute emulator! Depending on the web role instance (0 or 1) a different session cache is used.

It looks like each web role instance is still using default ASP.NET in-proc session state, meaning you'd have different session state on each instance.

However, the session id is the same

image

I made sure the default in-proc session state provider is removed by commenting it and <clear/>ing the providers list:

<!--<sessionState mode="InProc" customProvider="DefaultSessionProvider">

  <providers>

    <add name="DefaultSessionProvider" type="System.Web.Providers.DefaultSessionStateProvider, System.Web.Providers, Version=1.0.0.0, Culture=neutral, PublicKeyToken=31bf3856ad364e35" connectionStringName="DefaultConnection" applicationName="/" />

  </providers>

</sessionState>-->

<!-- If session state needs to be saved in AppFabric Caching service, add the following to web.config inside system.web. If SSL is required, then change dataCacheClientName to "SslEndpoint". -->

<sessionState mode="Custom" customProvider="AppFabricCacheSessionStoreProvider">

  <providers>

   <clear/>

    <add name="AppFabricCacheSessionStoreProvider"

          type="Microsoft.Web.DistributedCache.DistributedCacheSessionStateStoreProvider, Microsoft.Web.DistributedCache"

          cacheName="default"

          useBlobMode="true"

          dataCacheClientName="default" />

  </providers>

</sessionState>

All over again – it works in the Cloud

Not sure I did something wrong in the Lab sample – I started all over again from scratch with a simple app that stores the text box value into the Session[] state and reads it back using the buttons. Value/InstanceId/SessionID are written to the label below.

Same problem on the local fabric – BUT …

… storing from IE’s first tab the value “m5” to web role instance 0 in session 5WJJ:

image

Reading back from IE’s second tab the value “m5” from web role instance 1 in session 5WJJ:

image

gives me what I expected.

Help

As I understand this should not be the case? Seems to be an issue in the local compute emulator using the AppFabric cache service! It works in the cloud – but still makes local testing hard. Any ideas?

Nov 23, 2011

Fun Project: DotNetNuke module development

This post shows you how to create a DNN module in C# using Visual Studio 2010 – from beginner to beginner – to make expectations clear.

Requirements

In time with the site going live, new requirements popped up:

  • online bookings of treatments by clients
  • manage massage treatments through my wife
  • booking selected treatments using a kind of schedule/calendar view (clients) in predefined time windows / opening hours (admin).
  • email confirmations (client and admin)

I found no module for these Sad smile.

Visual Studio Project Template

As Visual Studio and C# are my friends, I downloaded the DNN template from dotnetnuke.codeplex.com and added a new project to my VS 2010 solution:

image

which added the following structure:

image

changed to .NET framework to 4.0 and added my custom namespace

image

Performing a Release build

image

Packaging

Right clicking the module project in the solution explorer and choosing “Build Deployment Package” creates the necessary CMS upload package BookingModule_00.00.01_Source.zip in the packages sub folder.

The packing script error:

Error    1    The target "Package" does not exist in the project.   

can probably be ignored. It indicates the build script references the solution file rather than the csproj project file.

image

Note the packaging scripts are included in your DNN module project folder “BuildScripts”

image


Host Login

When I created the DNN site within my hoster’s portal, I got asked to create two login account credentials:

  1. Administrator: create pages, add installed modules to pages, change skins and styles, etc.
  2. Host: same as the administrator, but with additional rights, one of these is installing new modules

So you must log in with your host account

image

to see the additional site menu items “Admin” and “Host”. Clicking host shows the Extensions icon:

image

to see the DNN framework (version), Authentication System, Container, Library, Module, Provider, Skin, Skin Objects and in the bottom right pane the command to install a new module Install Extension Wizard:

image 

selecting and uploading the previously built release package, next, booom!

Install Extension

Upload Results
If you have reached this page it is because the installer needs to gather some more information, before proceeding.

Error reading the zip package - see below

StartJob
Reading Installation Manifest file

Info
Reading Package Manifest - Module - BookingModule

Failure
Install aborted - The module being installed is not compatible with your host application version ( an upgrade is required )

I spent some time googling for answers, found some useful hints, saying the module is not compatible with my DNN version. But my problem remains: I cannot update my CMS with my hoster and I’ve got the latest Visual Studio template!? Hm. The solution was in the VS project DNN manifest file (project.dnn):

<dotnetnuke type="Package" version="5.0">

  <packages>

    <package name="BookingModule" type="Module" version="00.00.01">

      <…/>

      <dependencies>

       <dependency type="CoreVersion">06.00.00</dependency>

      </dependencies>

You need to delete the dependencies node, rebuild, repackage, upload again:

image

Yeah.

image

You can now add it to you page / pane as host –> edit mode –> common task –> add module

image

and when the module has the same rights as the page, then you can see it. There’s a context menu added

image

that let’s you switch to an “Edit Module” view or “Settings” view. Do you remember the three .ascx asp.net user controls in the above module project?

I hope this blog post gave you some overview of DotNetNuke module developments to get started with, including some pitfalls (I have fallen into).

Next time, I plan to show you the development of the web stuff, including the database model, data access, UI.

Fun Project: DotNetNuke – Failing with WebMatrix/ Orchard

No, I’ve not been in jail – but I’ve been very busy in a project recently and could not share my .NET insights with you. So I start again with a fun project, in a field I never work or accept customer mandates so far: web development, CMS, homepages.

It all started in an evening effort to create a web site for my wife’s new hobby (ehm, business): wellness, wellbeing, massage.

Microsoft WebMatrix / Orchard

I started with the latest and smallest .NET (what else) open source content management system (CMS) out there: Microsoft Orchard using WebMatrix. Learned the tool basics, got into the CMS, created some content, browsed through some free skins, modified CSS (with blood and sweat), had fun and insights …

image

… but failed due to hosting restrictions from my shared web hoster (Microsoft Orchard 1.2.41 / ASP.NET 4.0 / SqlCompact 4) with a security exception (Exception Details: System.Security.SecurityException: That assembly does not allow partially trusted callers.). As I did not want to update my subscription to a more expensive one, I went back to “field 1” to start all over again.

Learning: Orchard needs full trust shared hosting.

DotNetNuke

But my hoster supports DotNetNuke (DNN) 05.06 Community Edition! Another new experience for me.

Installation

It took a couple of web forms filling (SQL connection, accounts, etc.) and 10 minutes waiting time for the installation on my hoster’s management portal. A no brainer.

Customization

After log-in to the deployed CMS you can start adding pages, adding modules to pages, adding content to modules.

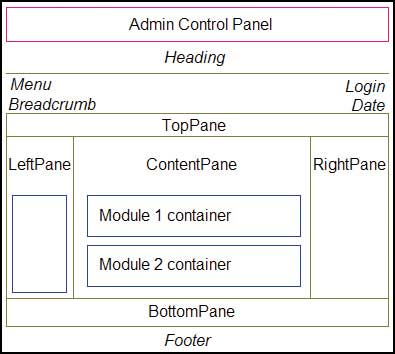
Modules are added to panes of a page. Panes are typically the following areas:

Blood and sweat again: there just the so called “MinimalExtropy” skin to start with – or get a bunch of commercial skins or create your own using commercial tools. But I wanted to migrate my Orchard CSS to MinimalExtropy, which took me another (long) evening.

@import url("css/menu.css");

/* CSS Document */

#Body {background: url(images/body_bg.png) #c6e29f fixed no-repeat center bottom; height:100%; margin:0; padding:0; }


/* ControlPanel style */

.ControlPanel{background:transparent url(images/cpanel_center.png) repeat-x bottom left; border:none;padding-bottom:10px;}

.cpanel_left {background: url(images/cpanel_left.png) no-repeat bottom left;padding-left:21px;}

.cpanel_right {background: url(images/cpanel_right.png) no-repeat bottom right;padding-right:33px;}


/*-------- Default Style --------*/

body,th,td,table,h1,h2,h3,h4,h5,h6,.Normal,.NormalDisabled,.Head,.SubHead,.SubSubHead, a:link, a:visited, a:hover, input, .CommandButton{color:#2E3D47; font-family:Verdana, Arial, Helvetica, sans-serif;}

body,th,td,table,.Normal,.NormalDisabled,.Head,.SubHead,.SubSubHead, a:link, a:visited, a:hover{font-size:12px;}

h1, h2, h3, h4, h5, h6, h2 input{color:#375162;font-weight:bold;margin:1ex 0;}

h1{font-size:18px;margin:10px 0;}

h2, h2 input{font-size:14px;}

h3{font-size:13px;}

h4{font-size:12px;}

h5{font-size:11px;}

h6{font-size:10px;}

… and the like.

There are a couple of pre-installed modules for DNN and an ecosystem of free and commercial modules out there. A module is a kind of a web part like blogging, picture gallery, etc.

image